
Author: Dejan Sakelšak
Spring Boot (link) is an awesome Spring module that enables you to run Java web applications without the need of external servlet engines like Jetty or Apache Tomcat and speeds up the process of setting up a Spring based project.
Context initialization with Spring Boot
In short words, Spring Boot, uses an autoconfiguration principle where the application sets itself up using default configuration options with additions and overrides of configurations from the project hierarchy structure.
The way Spring instantiates beans (or components) is by scanning a configured package in the classpath. Candidates for instantiation are classes with annotations like @Component or @Bean.
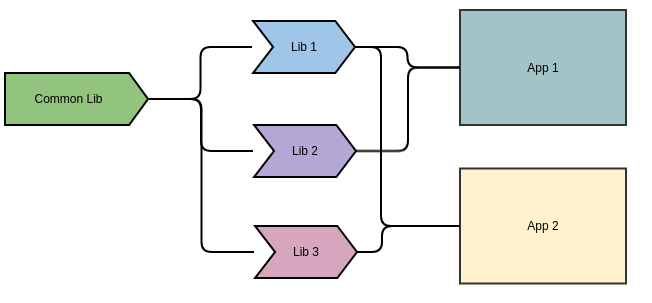
Project hierarchy and dependencies
A very common approach when creating a project structure is to have library and utility artifacts with common code that you share between different modules. Often these library artifacts may contain annotated Spring beans that, when scanned, will be added to the Spring context.
Nothing wrong with the way this works at it’s base. The problems start when one of the top level application modules needs to add some specific behavior, or wants to override some behavior of the Spring beans instantiated from the libraries. In this case getting the instantiated bean discarded, or ignored, becomes a dirty business of using the @Primary annotation or even profiles. Sometimes none of these can help due to the component loading sequence of the autoconfiguration mechanism.
Setting the Spring property spring.main.allow-bean-definition-overriding=true may also cause more pain than gain. This setting might result in an unpredictable startup and instantiation.
So how can we solve these problems?
There are 3 approaches you can take on fixing the problems with instantiation overrides:
- Cope with the
@Primaryannotation - Use abstract classes in library and concrete classes in the application
- Omit annotations in the library and use Spring configurations to instantiate the bean
1. Cope with the Spring Boot @Primary annotation
Using the @Primary annotation is easy, but not always the best choice.
Let’s define our interface we’ll be implementing in the specific Spring beans:
public interface SomeService {
    void doNothing();
}
Let’s now create a concrete implementation of the interface above that we’ll “use” all over our applications.
@Component
public class SomeServiceImpl implements SomeService {
    public SomeServiceImpl() {    }
    @Override
    public void doNothing() {
        System.out.println("Nothing...");
    }
}
And let’s now implement a more specific implementation of the same interface that we’ll use in just one application.
@Primary
@Component
public class SomeSpecificServiceImpl implements SomeService {

    public SomeSpecificServiceImpl() {
    }

    @Override
    public void doNothing() {
        System.out.println("Something for nothing...");
    }
}
It will fix your problem in simple cases where you need to override the instantiation of one specific bean, but in cases where you already used the @Primary annotation on a bean implementing SomeService, you will end up having conflicts.
2. Use abstract classes in library and concrete classes in the application
The second option is sharing just an abstract class and then extending it in your application into a concrete form.
We’ll still use the same interface as in the first case.
public abstract class SomeAbstractService implements SomeService {
    public SomeAbstractService() {
    }

    @Override
    public void doNothing() {
        System.out.println("Nothing...");
    }
}
And then in each of your applications you can extend and annotate like this:
@Component
public SomeServiceImpl extends SomeAbstractService {
    public SomeServiceImpl() {
        super();
    }

    // Additionally you can override the implementation of doNothing()
    // and get the specific behavior
}
This option produces quite a bit of code duplication and makes the code base messier.
3. Omit annotations in the library and use Spring configurations to instantiate the bean
The third option is to implement the generic service in the library but not annotate it with @Component and then instantiate it in each application.
Let’s implement our library generic service again, this time without annotations:
public class SomeServiceImpl implements SomeService {
    public SomeServiceImpl() {
    }
    @Override
    public void doNothing() {
        System.out.println("Nothing...");
    }
}
And then set up the Spring configuration in the application to instantiate it:
@Configuration
public class SomeServiceConfiguration {

    @Bean
    public SomeService someService() {
        return new SomeServiceImpl();
    }

}
If we need an implementation with some specific behavior, we can implement it in our application like this:
public class SomeSpecificServiceImpl extends SomeServiceImpl {
    public SomeSpecificServiceImpl() {
        super();
    }
    @Override
    public void doNothing() {
        System.out.println("Something for nothing...");
    }
}
And then instantiate it in a configuration similar to the above like this:
@Configuration
public class SomeServiceConfiguration {

    @Bean
    public SomeService someService() {
        return new SomeSpecificServiceImpl();
    }

}
In this case, we can actually use @Component on the derived class SomeSpecificServiceImpl, which will result in the right behavior.
A special case with Spring Boot and Jackson
Often we want to set custom JSON serialization/deserialization options on the Jackson’s ObjectMapper instance, to get the desired format. When using the main ObjectMapper bean from the context we rely on the notion that the instance is exactly what we configured. Well, there are some cases that this might not be true.
If you are building our application without bringing in the entire Spring MVC/Web stack at first, the ObjectMapper might really be the instance you configured. But after bringing in the Spring MVC/Web stack, Spring Boot, will most probably autoconfigure the MVC dependencies with default settings in a step before the actual custom ObjectMapper instance is instantiated and resulting in a collision afterwards.
The only way you might be able to override this is to move our ObjectMapper bean configuration in a module that will get instantiated before all this. Basically you need to define a JAR library onto which all our submodules depend and there configure our ObjectMapper with something like this:
@Configuration
@EnableAutoConfiguration
@AutoConfigureBefore(value = {JacksonAutoConfiguration.class})
public class GlobalSettingsConfig {
    @Bean
    @Primary
    public ObjectMapper jacksonObjectMapper() {
        ObjectMapper mapper = new ObjectMapper();
        mapper.configure(DeserializationFeature.FAIL_ON_UNKNOWN_PROPERTIES, false);
        mapper.configure(MapperFeature.SORT_PROPERTIES_ALPHABETICALLY, true);
        mapper.configure(SerializationFeature.ORDER_MAP_ENTRIES_BY_KEYS, true);
        mapper.configure(SerializationFeature.WRITE_DATES_AS_TIMESTAMPS, false);
        mapper.configure(SerializationFeature.WRITE_DATES_WITH_ZONE_ID, true);
        mapper.configure(DeserializationFeature.ADJUST_DATES_TO_CONTEXT_TIME_ZONE, false);
        mapper.registerModule(new JavaTimeModule());

        return mapper;
    }
}
Conclusion
Spring Boot is a phenomenal technology for modern application development, but it has some quirks. Often I find myself wondering if all this autoconfiguration “magic” actually helps you with bigger projects where you find yourself battling with this sort of magic and trying to prevent unwanted behavior.
Deciding which of the 3 types of bean/component instantiation to use in our application depends on the actual architecture. Normally I decide to have strict control over internal business logic services whereas MVC controllers and other similar beans that will probably be added often and don’t require such logic overrides are left to be picked up by spring boot and the component scanner.
I hope this post helps anybody wandering around the internet to find a solution to their Spring Boot instantiation problems. Otherwise you can always hire me on freelancermap.com ;).